
At its heart, the support and resistance trading strategy is a classic technical analysis approach. It's all about finding specific price levels where an asset's price has a history of pausing and changing direction. Think of these levels as a floor (support) and a ceiling (resistance), which help you spot potential opportunities to enter or exit a trade. Mastering these price barriers is a fundamental step toward making more calculated trading decisions.
Why Support and Resistance Levels Actually Work

Ever watched a stock's price seem to hit an invisible wall and turn around? It’s not a coincidence. What you're seeing is market psychology playing out in real-time. These levels are far more than just lines on a chart; they are the battlegrounds where the collective memory and emotions of traders collide.
The reason a support and resistance strategy can be so effective is that it taps into powerful, self-fulfilling prophecies created by collective market behavior. For example, if a stock struggles to break past $50 time and time again, traders start to expect a sell-off at that exact point. They place sell orders there, which reinforces $50 as a solid resistance level. This shared psychological reaction is precisely what makes these historical price points so critical for traders of all sizes, from individuals to large institutions.
The Foundation of Fear and Greed
When you strip it all down, support and resistance are driven by two of the most powerful emotions in trading: fear and greed.
- Support (The Floor): This is where buying pressure consistently overpowers selling pressure, putting a halt to a price decline. It’s often fueled by the fear of missing out (FOMO). Buyers who were on the fence now see a chance to get in at what they perceive as a bargain.
- Resistance (The Ceiling): On the flip side, this is where sellers take charge, preventing the price from climbing higher. This level is driven by the fear of losing profits. Traders who bought at a lower price see this as the perfect time to cash out and secure their gains.
These psychological anchors are what transform simple price points into zones of intense interest. As a price nears a well-established support level, buyers tend to emerge. As it approaches resistance, sellers step in. This predictable dance is what makes the entire strategy tick.
Getting a handle on this dynamic is essential. The best way to see this push and pull is by studying the price action on a chart. To really sharpen your skills, I recommend our guide on understanding candlestick charts, which will give you a much clearer view of the market's emotional state at these key levels.
How to Pinpoint High-Probability Trading Zones
Here’s where we separate the amateurs from the pros. At the core of any good support and resistance strategy is the ability to identify price levels that actually matter. Forget about drawing a single, thin line on your chart; the market is rarely that precise. Experienced traders know the secret is to pinpoint high-probability zones where the price is most likely to react.
Think of these levels less as a brick wall and more as a dense patch of mud. Price doesn't just hit a specific number and stop dead. It slows down, struggles, and churns within an area. Viewing support and resistance as zones accounts for this market "noise" and helps you avoid getting knocked out of a perfectly good trade just because the price overshot your line by a few pips.
So, how do you find them? It all starts with looking back at historical price action. What happened in the past gives us our best clues for what might happen next. This isn't just a forex trick; it's a fundamental principle used across all financial markets, from stocks to the currency pairs on your OTC Charts MT4 platform. You can get a deeper dive into how institutions apply these concepts by checking out this guide on integrating support and resistance.
Marking Key Levels on Your Chart
The most trustworthy zones almost always form around previous turning points in the market. As you scan your charts, you need to train your eye to spot a few specific things.
Start by looking for these three key elements:
- Major Swing Highs and Lows: These are the big, obvious peaks and valleys where the trend made a significant U-turn. They’re critical because they mark where a flood of buying or selling pressure previously slammed the brakes on price.
- Areas of Consolidation: Pay attention to where the price went sideways for a while before breaking out. The top and bottom of these trading ranges often act as incredibly strong barriers when the price returns to test them later.
- Psychological Round Numbers: Don't ever discount the power of big, clean numbers. Think $50.00 for a stock or 1.3000 for a currency pair. Traders are human, and we're naturally drawn to these round figures, so you’ll often find a cluster of orders waiting right there.
I see so many traders plaster their charts with dozens of lines until it’s unreadable. A clean chart leads to clear thinking. Stick to the most obvious, high-impact zones—the ones the market has clearly respected multiple times. In this game, less is almost always more.
When you start combining these techniques, you stop being a reactive line-drawer and start analyzing the market like a professional. You’ll be anticipating where price is likely to struggle, giving you a massive edge in building a trading plan that’s both consistent and profitable.
Executing Trades: The Bounce vs. The Breakout
Alright, so you’ve drawn your lines and identified your key support and resistance zones. Now for the hard part—actually making a trade when the price hits one of those levels. This is where the rubber meets the road. Your entire strategy boils down to what you do in these moments.
Fundamentally, you've got two main playbooks: you can either trade "the bounce" or "the breakout."
Your choice between these two isn't random; it's a reflection of your trading style and what the market is telling you. Are you betting that the level will hold strong, or that it’s about to get smashed to pieces?
The Bounce Strategy: Banking on Rejection
The "bounce" is classic range-trading. The core idea is simple: you're making a calculated bet that a support or resistance zone will act like a wall, causing the price to reverse. It's a contrarian move, as you're essentially fading the immediate price direction.
-
At a support level: As the price drops into your zone, you're looking for any hint that buyers are waking up. A bullish candlestick pattern, like a hammer or a bullish engulfing candle, is often the green light you need to confirm that buying pressure is building.
-
At a resistance level: The opposite is true. You're watching for sellers to take control. A bearish pattern, like a shooting star or a bearish engulfing candle, can be your signal to go short, anticipating a drop.
Think of it like this: manual analysis gives you control and deep understanding, but automated tools give you speed. In trading, both are incredibly valuable.
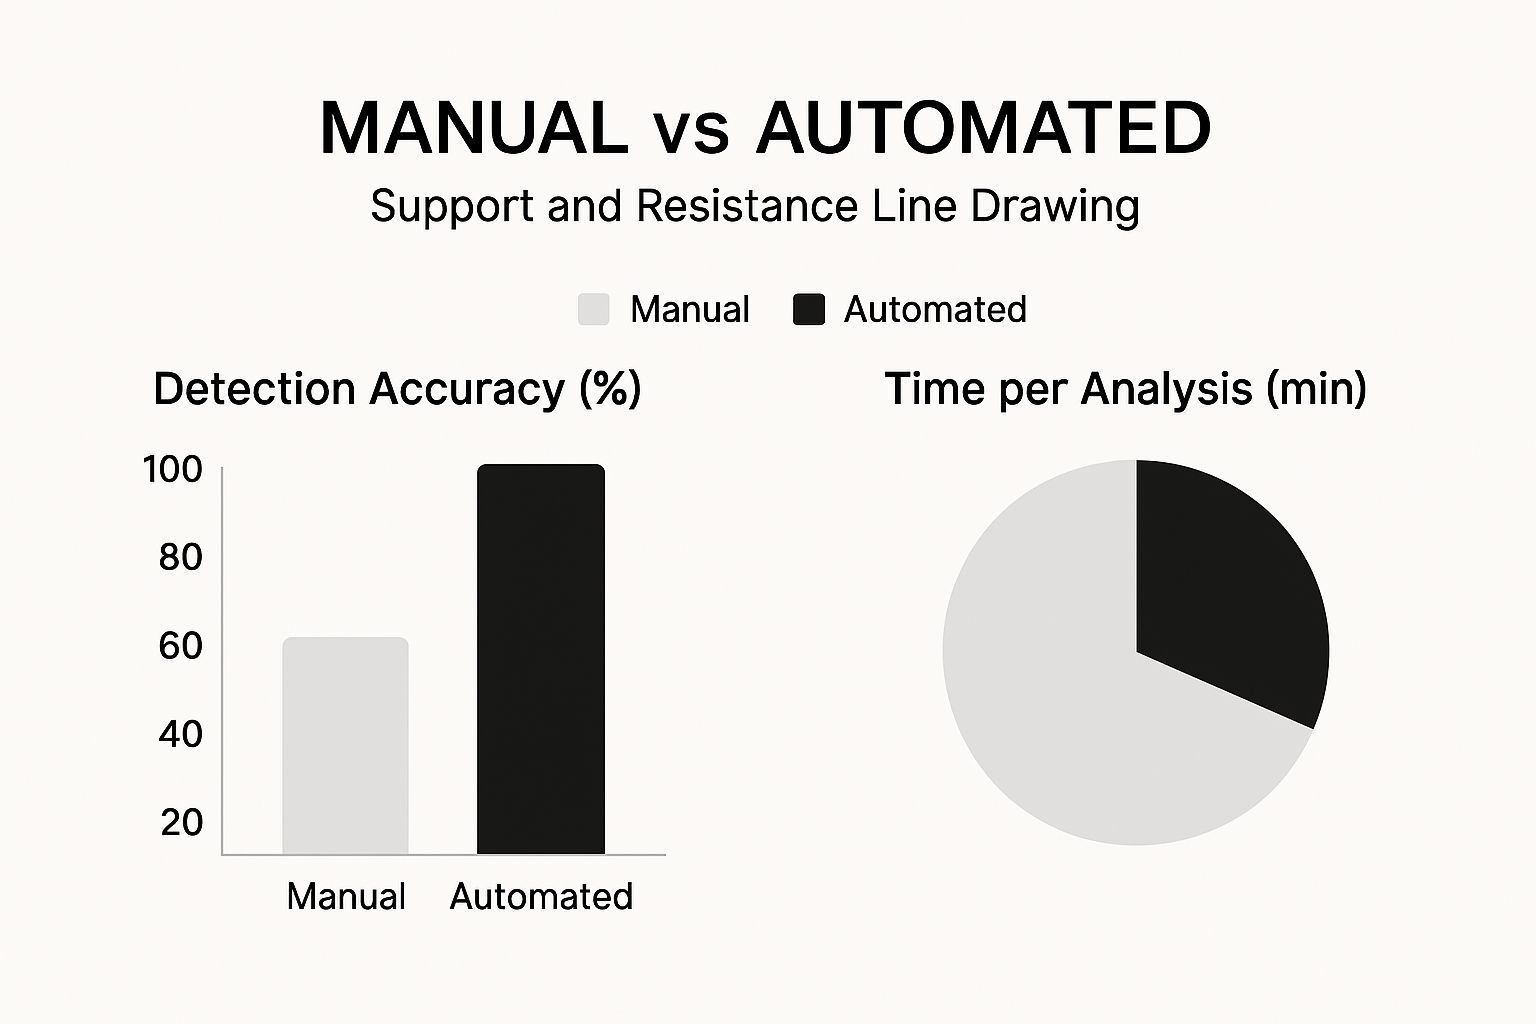
The data here makes a compelling case. While nothing beats your own eyes for accuracy, the speed advantage of automation can mean the difference between catching a move and missing it.
The Breakout Strategy: Riding the Wave of Momentum
The alternative is to trade the "breakout." This is a pure momentum strategy. Instead of betting against the move, you're waiting for the price to blast through a level with conviction, then you jump on board to ride the momentum. You’re aligning yourself with the new, powerful force in the market.
A rookie mistake I see all the time is entering a breakout too soon. A little flicker above a line isn't a breakout. The pros often wait for what’s called a "break-and-retest"—where the price breaks through, comes back to test the old level from the new side, and then continues. That’s a much higher-probability setup.
Bounce vs Breakout Strategy at a Glance
So, which one is better? Neither. They are just different tools for different market conditions and trading personalities. Understanding the key differences is crucial before you risk any capital.
This table breaks down the two approaches side-by-side.
| Metric | Bounce Trading (Range) | Breakout Trading |
|---|---|---|
| Methodology | Fading momentum; betting on level rejection. | Following momentum; betting on level failure. |
| Market Condition | Best in consolidating or range-bound markets. | Best in trending markets with strong momentum. |
| Typical Success Rate | Higher (60-65%), but with smaller wins. | Lower (55-60%), but with larger potential wins. |
| Typical Risk-Reward | Often around 1:2. | Can often reach 1:3 or more. |
| Key Challenge | Avoiding "catching a falling knife" if a level breaks. | Avoiding "false breakouts" or "fakeouts." |
Ultimately, both strategies can be profitable, but they demand different kinds of patience and risk management. Breakout trades might offer bigger home runs, but you’ll likely strike out more often. Bounce trading can provide more consistent singles and doubles.
No matter which path you choose, your success hinges on being able to read the story the chart is telling you. If you need to brush up on the fundamentals, our guide on how to read stock charts is a great place to start.
Advanced Techniques to Refine Your Strategy

Once you've got the hang of drawing basic support and resistance lines, it’s time to take your analysis to the next level. This is where you start to find the real high-probability setups that can define your trading success.
A concept that has served me incredibly well over the years is role reversal. This is a powerful market dynamic where a broken support level flips to become new resistance, or a shattered resistance level turns into solid support.
When a key level breaks, the psychology of the market participants shifts. Suddenly, buyers who were defending a support level might be looking to sell at that same price just to get out at break-even. This creates a fresh wave of selling pressure, turning that old floor into a new ceiling.
I’ve found that a break-and-retest of a role reversal zone is one of the most reliable signals you can find. It’s the market giving you a clear nod that the old dynamic has fundamentally changed.
Adding Indicators for Confirmation
While price action is king, you don't have to rely on it alone. Adding a couple of well-chosen indicators can provide a powerful layer of confirmation, helping you filter out weak signals and focus on what truly matters. This isn't about cluttering your charts; it's about building a stronger case for each trade.
Here are a couple of my go-to tools for this:
- Moving Averages: A widely followed moving average, like the 50-day or 200-day Simple Moving Average (SMA), can act as a powerful dynamic support or resistance level. When one of these MAs lines up perfectly with a horizontal price zone you've identified, that area becomes a zone of confluence—a much stronger signal.
- Relative Strength Index (RSI): This is a classic momentum oscillator that's great for spotting exhaustion. If price pushes up to a key resistance level and the RSI is simultaneously showing an overbought reading (above 70), it’s a strong hint that the upward momentum is fading. A downturn in the RSI from that point adds significant weight to a potential short trade.
By weaving these elements together, you stop chasing every potential setup and start focusing only on the A+ opportunities.
Of course, no strategy is complete until you’ve proven it works. The only way to build true confidence is by putting it through its paces with historical data. You can learn more about how to backtest trading strategies to validate your approach properly. This is what separates the professionals from the hopefuls.
Here is the rewritten section, designed to sound like an experienced human expert.
Where Traders Go Wrong (And How You Can Get It Right)
I’ve seen it time and time again: a trader has a solid strategy for support and resistance, but they still lose money. Why? Because successful trading is less about what you do right and more about the mistakes you don't make. The most damaging mistake I see is treating support and resistance levels like they're laser-etched lines on a chart.
Let’s get real. The market is a messy, emotional beast, not a neat physics equation. Price almost never reverses at the exact pip you’ve marked. You need to start thinking of these levels as broader zones of activity. This one mental shift is a game-changer. It helps you avoid getting knocked out of a perfectly good trade by random market noise and gives you much better, more flexible entry opportunities.
The Twin Account Killers: Impatience and Bad Risk Management
Another major pitfall is simply not being patient enough. So many traders see the price getting close to their level and dive in headfirst, afraid of missing out. A winning support and resistance strategy requires you to wait for proof. You need to see the market confirm your idea, maybe with a clear candlestick pattern showing rejection, before you risk your hard-earned money. If you don't wait for confirmation, you're not trading—you're gambling.
The urge to jump into a trade can feel overwhelming, but discipline is what separates the pros from the crowd. Let the market play its cards first; then you can place your bet with confidence.
Finally, even the best entry can be ruined by sloppy risk management. This is where most traders hemorrhage capital. A few classic blunders include:
- Setting stops way too tight: If your stop-loss is just a few pips on the other side of your line, you’re practically asking the market to take you out. Give the trade some breathing room.
- Getting greedy with profits: Not setting a clear take-profit target is a rookie move. It often leads to watching a great trade turn into a loser because you didn't know when to cash out.
By actively sidestepping these common traps, you do more than just protect your account balance. You build the kind of discipline that’s essential for staying in this game for the long haul.
Answering Your Top Support and Resistance Questions
Even the best-laid plans can leave you with a few nagging questions. Let's tackle some of the most common ones I hear from traders who are just getting the hang of using support and resistance. My goal here is to give you clear, practical answers to help you trade with more confidence.
How Can I Tell if a Level Is Actually Strong?
The strength of any support or resistance level boils down to its history. Think of it like a battle line. The more times price has charged at that level and been repelled, the more significant it becomes. Each test and reversal reinforces its importance, almost like a self-fulfilling prophecy, because more traders start watching it.
Another huge factor is confluence. This is where your horizontal level lines up with other technical signals. For instance, does your support level also happen to be where the 50-day moving average is? Or does it fall on a big, psychological round number like $1.5000? When multiple signals point to the same area, the level’s strength multiplies.
What's the Best Timeframe to Use?
Honestly, this strategy works across all timeframes. There's no single "best" one; it just depends on your trading style. A scalper might live on the 1-minute or 5-minute charts, while a long-term swing trader will find their key levels on the daily or even weekly charts.
The most crucial thing to remember is that higher timeframe levels pack a much bigger punch. A major weekly resistance level is a brick wall compared to the flimsy fence of a 5-minute resistance level. Always give precedence to the higher timeframes.
Should I Draw Exact Lines or Broader Zones?
This is a big one. My advice? Always think in zones, not single lines. The market is driven by human emotion, not by perfect mathematical precision. Price will often spike a little past a level or turn just before it. Drawing a zone instead of a razor-thin line accounts for this market "noise."
This simple shift in perspective is a game-changer. It helps prevent you from getting stopped out by a minor wick that barely pierces your level and gives your trade a little more breathing room. It’s a small adjustment that can make a world of difference in your results.
Ready to put this into practice? You'll need professional-grade tools. For Pocket Option users, OTC Charts MT4 delivers the real-time, accurate OTC data essential for applying your support and resistance strategy with precision. Get your charting edge today at otc-charts-mt4.com.